
Accessing Astera’s Server APIs Through a Third-Party Tool
1. Introduction
This article is intended to provide a brief user guide to Astera users on how they can use Astera Server APIs to perform some commonly used actions without using the Astera Client.
The document covers the following operations:
Configure Astera Server properties
Configure Astera Server license
Deploy user projects on Astera Server
Schedule/execute the jobs
2. Environment setup and tools used
For the use cases below, Astera Integration Server is installed on a Virtual Machine and no Astera Client is going to be used to perform operations. However, some images of the Astera Client have been used for description purposes. We will use the Postman client as a third-party tool to send API requests to the Astera Server to perform several tasks.
3. Use Cases
3.1. Login or Get authorization token API
3.1.1. Login API example (/api/account/login)
‘POST /api/account/login’
This API returns the bearer token that can be used to make calls to the Astera Server. It also returns some more information about the user.
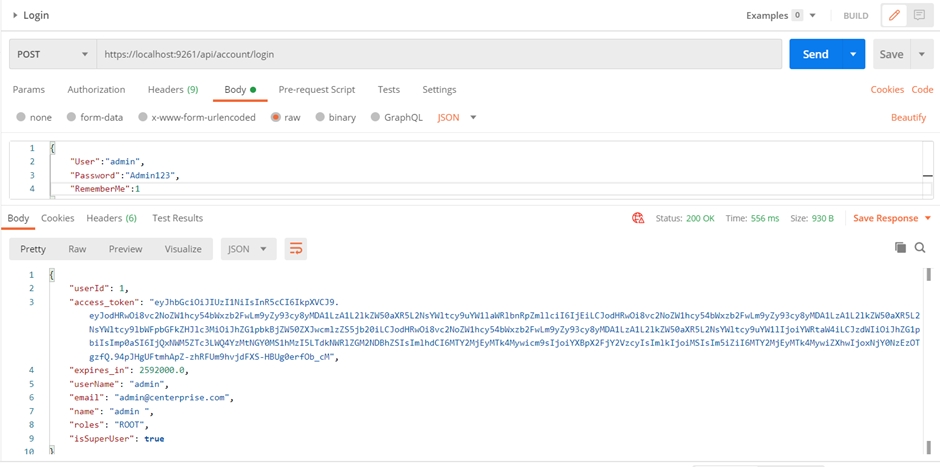
3.1.2. Login API parameters description
https://localhost:9261/api/account/login
Description
{
"User":"admin",
Username of the user trying to login (default is "admin")
"Password":"Admin123",
Password of the user trying to login (default is "Admin123")
"RememberMe":1
This parameter takes 1 or 0, indicating True or False.
}
3.2. Configure Server Properties
3.2.1. Configure Server properties API example (/api/Server/Config)
In this section, we are going to use the API ‘POST /api/Server/Config’ to change Server Profile of the Astera Server.
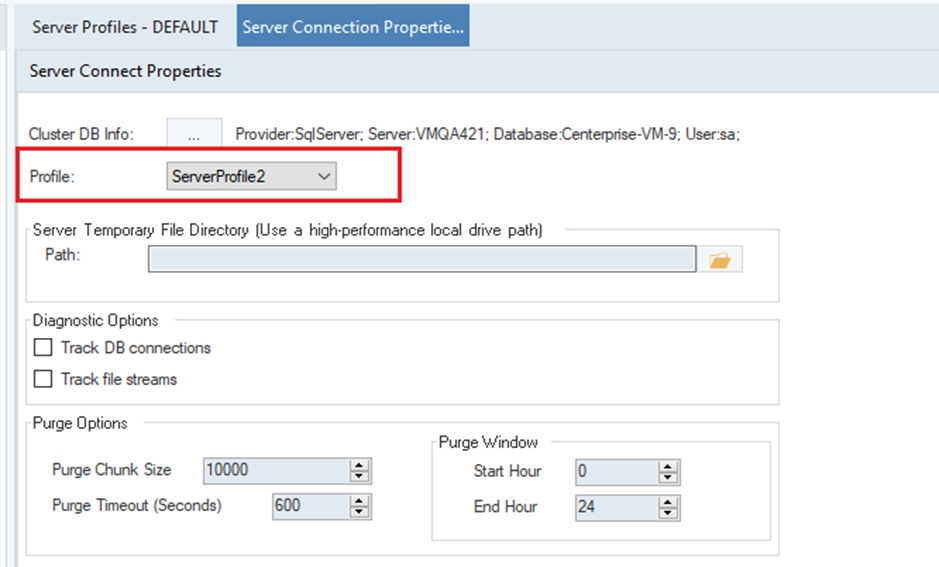
Here, we can see that a Server Profile named DEFAULT has been selected in our Server Properties.

To change this profile shown in the image above, we must provide the JSON body containing information related to the Repository Database with the name of the desired Server Profile in the POST request.
Once we have provided the relevant information, we can send the request.
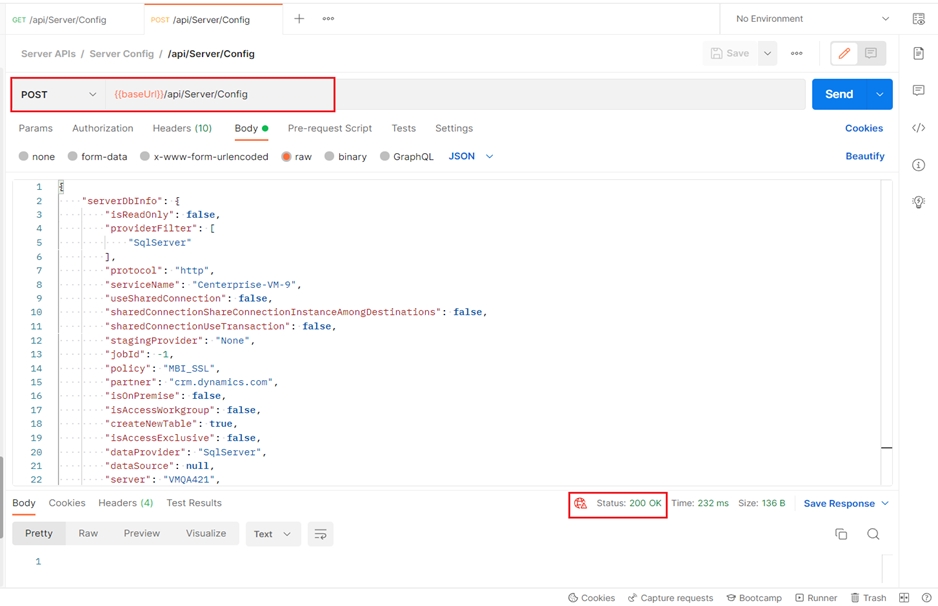
We can see that a 200 OK success response is received in the image above.
We can verify using the Astera Client that we have successfully configured our server with the desired profile ServerProfile2.
A sample server config JSON body is provided here for reference.
3.2.2. Server properties configuration API Parameters description
{
"configParameters": {
This section is recommended to leave defaulted.
"instrumentationOn": false,
Instrumentation slows down a server's processing capacity, but adds more logging for visibility. Only set to "true" when you want to debug an issue with the server or job running on that server.
"purgeChunkSize": 10000,
This is the number of records the server will try to delete at once when purging old job and event history from the cluster database.
"purgeCommandTimeoutSeconds": 600,
This is how long the server should wait for the SQL command to complete before giving up on a purge operation.
"purgeWindowStartHour": 0,
This is the beginning of the 24-hour window in which the server can attempt to purge old job and event history from the cluster database.
"purgeWindowEndHour": 24
The is the end of the 24-hour window in which the server can attempt to purge old job and event history from the cluster database.
},
"serverDbInfo": {
"port": 1433,
SQL Server database port on which instance is running on
"protocol": "http",
Protocol for connecting
"serviceName": "RepositoryDWB",
Name of the database
"authenticationType": "SqlServerAuth",
Type of authentication, SQL Server Authentication or Windows logon
"connectionTimeOut": 15,
Timeout when trying to connect to the instance
"commandTimeOut": 90,
Timeout when executing a command on the SQL server instance
"dataProvider": "SqlServer",
Database provider name. Either SqlServer or PostgreSQL
"server": "localhost",
Database instance host server
"database": "RepositoryDWB",
Name of the database
"isRepository": true,
This option is used to tell the server that this connection is pointing to an Astera repository. Always set this to true.
"schema": "",
Schema of the database, by default it’s 'dbo'
"user": "sa",
Username for logging in to the SQL Server
"password": "Astera123"
Password for logging in to the SQL Server
},
"port": 9261,
The port where Astera Integration Server is running on. By default its 9261, unless specified during installation
"serverProfile": "DEFAULT",
Astera Integration Server profile configuration. User can create different profiles for different servers, in this profile the user can set the max job count and other administrative properties.
}
3.3. Manage Server License
3.3.1. Change license key API example (/api/License/Key)
In this section, we are using the POST /api/License/Key API that allows the user to change the server license. We will also use the POST /api/License/Activate API to activate the license.
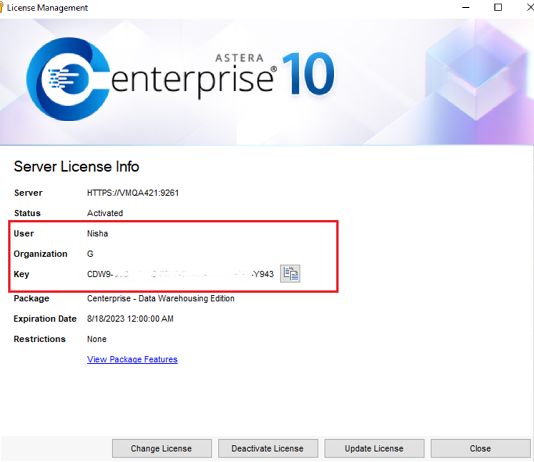
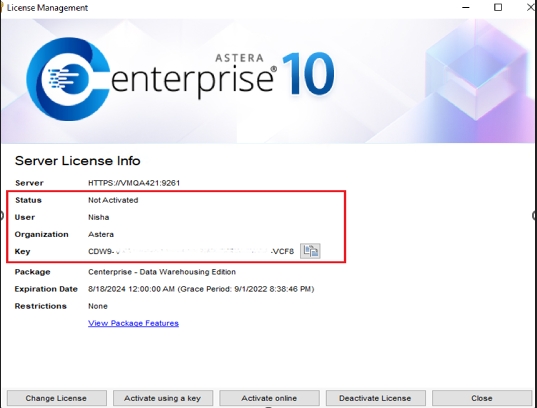
Go to Server > Configure > Enter License Key. Here, we can see a user ‘Nisha’ of the organization ‘G’ is registered with an active license.
To change the license key and register the user, we must provide the User, Organization, and License Key in the JSON request body. Refer to image below.
Once we have provided the relevant information, we can send the request.
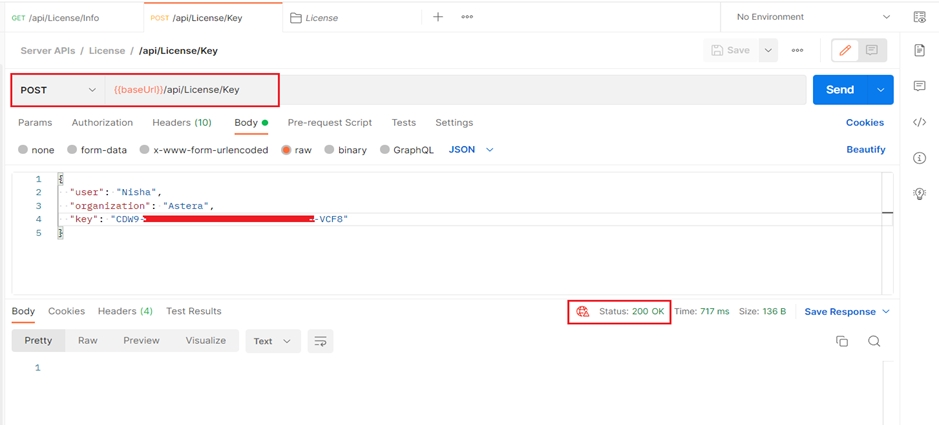
In response, we can see that a 200 OK success status is received indicating that the license key has been changed.
Now, go to Server > Configure > Enter License Key, and notice the license properties. We can see a user Nisha of the organization Astera with a different/new license key has been registered.
3.3.2. Change license API Parameter description
Description
{
"LicenseKeyRegistrationModel":
{
"user":"TEST",
Username you want to register the product with.
"organization":"TEST",
Organization name you want to register the product with.
"key":"TEST"
License Key provided by Astera Software.
}
}
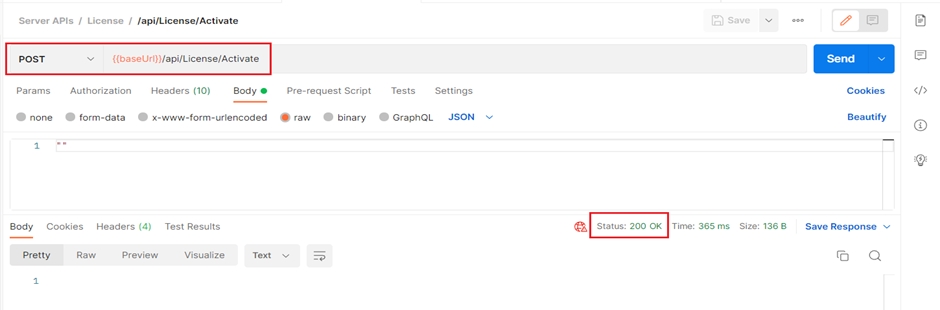
3.3.3. Activate license API Example (/api/License/Activate)
However, the license is not activated yet. To activate the license, we can simply send a request to the /api/License/Activate endpoint. After sending the request, we can see that a 200 OK response is received.
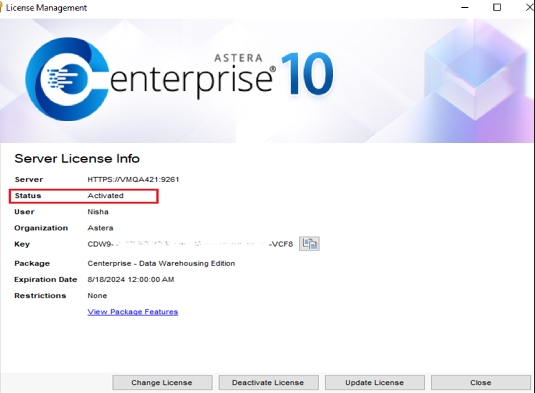
Go to Server > Configure > Enter License Key again. Here, we can see the status of the license is activated now.
3.3.4. Activate license Parameter description
No parameters required, send an empty body here.
3.4. Configuring Cluster settings
Configuration of cluster settings is important before proceeding with the project deployment.
3.4.1. Cluster settings API parameters description ‘/api/Cluster’
{
"id": 1,
This is the identifier for the settings object in the repository database. Should always be 1.
"name": "DEFAULT",
This is the name we want to give to our cluster (Server group), by default its set to 'Default'
"sendErrorInfoToAstera": true,
Allow sending anonymous usage and error data to Astera.
"purgeJobInfoAfter": 7,
The number of days before a job info will be purged (removed from the repository database). It will no longer be available in the Job Monitor after it is purged.
"purgeEventInfoAfter": 7,
The number of days before a Server event info will be purged (removed from the repository database). It will no longer be available in the Server Monitor after it is purged.
"stagingDirectory": {
Setting Staging directory in this section
"path": "C:\\Staging"
The staging directory path, this is where Astera Integration Server keeps files which are related to a deployment.
},
"deploymentDirectory": {
Setting deployment directory in this section
"path": "C:\\Deployment"
The deployment directory path, this is where Astera Integration Server keeps a local copy of deployment archive files(.car) and its configuration files (.cfg)
},
"pauseAllServers": false,
This parameter takes in a Boolean value to set the feature for pausing Astera Integration Servers on or off
"pauseServersFrom": null,
Start time when servers pause. Depends on if pauseAllServers is true.
"pauseServersTo": null,
End time when servers pause. Depends on if pauseAllServers is true.
"clientAndServersShareTheSameFileSystem": false
False if the client and the server do not share the same file system. This applies to any scenario when the client and server do not exist on the same machine or network.
}
The JSON payload sample for the cluster configuration is attached here.
3.5. Archive File Deployment (User project deployment)
To successfully deploy an archive file (User project .car file) using the APIs, a user must perform the following prerequisites:
Upload the archive file (User project .car file) to the deployment directory.
Upload the config file to the deployment directory. (optional)
3.5.1. Uploading the Archive File/Config File to the Deployment Directory
There are two methods to do this, let's see each in action.
a. Example of using ‘POST /api/UploadFile’
The user can upload the config and .car files to the deployment directory using APIs. There is a possibility that a user might delete or move the config or .car file from their local machine. To avoid any issues, it is recommended to first upload these files to the deployment directory.
To upload the file, use the ‘POST /api/UploadFile’ API. In this API, we must provide two query parameters:
FileTypes: Extension of the target file e.g., cfg for the config file, car for Archive files.
TargetFileName: Here, we define the target file’s name e.g., Testing.
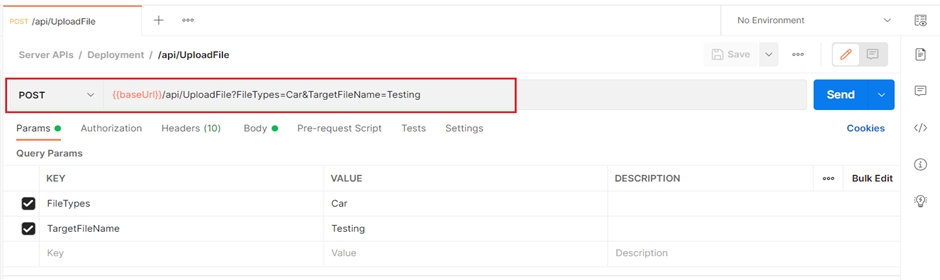
Next, we need to configure Request Body for this API. For the request body, select the form-data content type, select the Key type as File and provide the desired archive file (.car file) in the Value. Click Send.
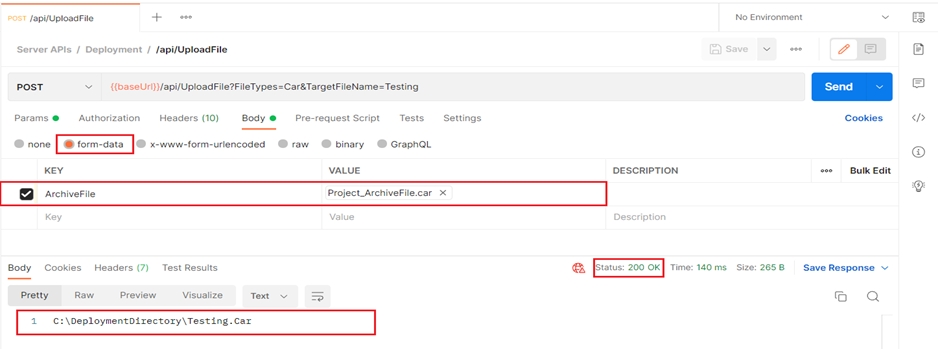
Here, we can see that a 200 OK response, with a file path of the deployment directory’s archive file, has been received. Please copy down this path on your notepad as we need to use this path while creating the deployment.
Similarly, we can upload the config file to the deployment directory using this api/UploadFile endpoint.
Parameter description of /api/UploadFile
Query Parameters
Description
FileTypes: Cfg
The extension of the file e.g., Car or Cfg. There are two files related to the Deployment, one is .car file, another is .cfg file. .car files are archive files which have the snapshot of the project when it was generated, and .cfg files are configuration files, it contains the values for the parameters which were used in the project.
TargetFileName: Testing
The name with which the uploaded files will be saved
Request Body (content-type form-data)
Description
ArchiveFile
In this parameter, attach the archive or configuration file you wish to upload to the deployment directory.
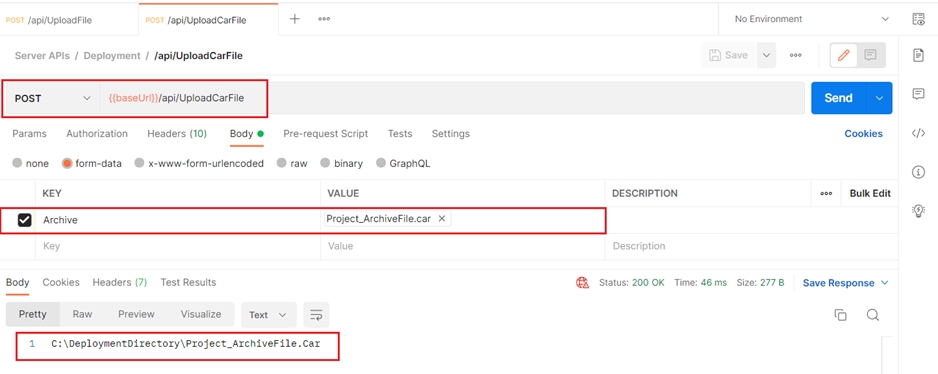
b. Using the ‘POST api/UploadCarFile’
An archive file (.car file) can also be uploaded to the deployment directory via another API i.e., ‘POST api/UploadCarFile’.
In this API, we do not need to specify the query parameters. Simply select the archive file (.car file) in the body and click Send. Here, we receive the archive file path in the response.
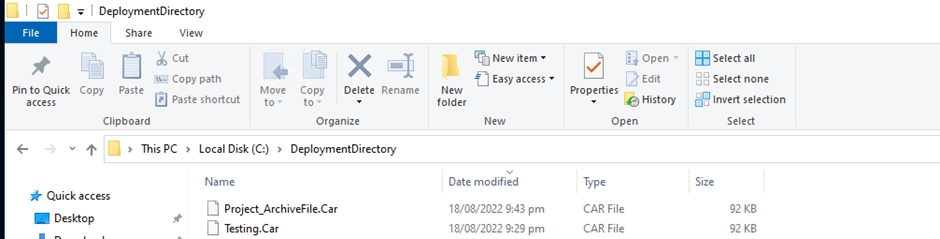
The uploaded files can also be seen in the deployment directory.
Parameter description of api/UploadCarFile
Request Body (content-type form-data)
Description
Archive
In this parameter, attach the archive or configuration file you wish to upload to the deployment directory.
3.5.2. Creating the Project Deployment
3.5.2.1. Using POST /api/Deployment example
Now, let’s proceed to the deployment creation. To create a deployment, we must use the ‘POST /api/Deployment’ API.
In this API’s Request’s Body, we must provide info such as:
Relevant archive (.car) and config (optional) file paths (both local and deployment directory file paths)
The deployment’s name, its ID, and its activation state, etc.
After defining the body, we can click Send.
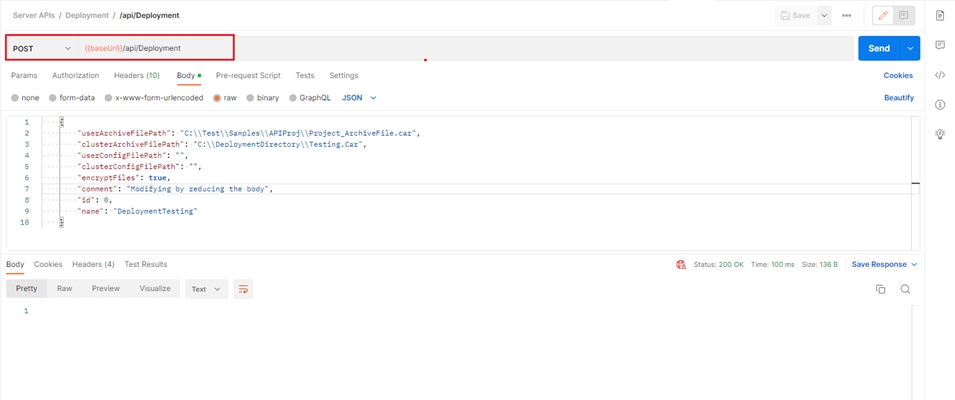
Here, we can see a 200 OK response has been received indicating that a deployment has been created.
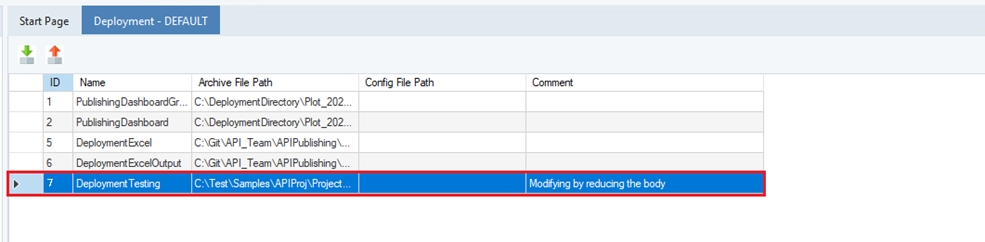
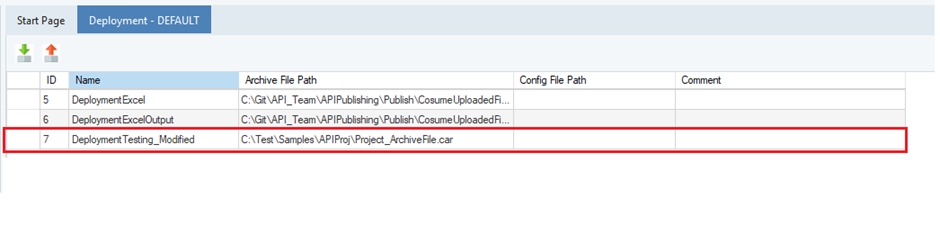
Open the client and go to Server > Deployment Settings > Deployment. In the deployment window, we can see the archive file has successfully been deployed.
A sample deployment JSON body is attached here for reference.
Please note the following:
To create a new deployment, we must provide the field “Id” as 0. We should also provide a unique deployment “Name” i.e., not the same name as an already existing deployment. Otherwise, the request will result in a 400 Bad Request error.
If we provide a non-zero “Id” field e.g., Id = 7, the server will consider this request as an update request, and if a deployment with ID 7 already exists on the server it will be modified/updated.
3.5.2.2. Parameter description of /api/Deployment
Description
{
"userArchiveFilePath": "C:\\Project_ArchiveFile.car",
This is the path that was the source .car file used for deployment. It is not used anywhere at runtime.
"clusterArchiveFilePath": "C:\\Testing.Car",
Archive file's (.car file's) deployment directory path, i.e, the path to the archive file that is uploaded in the deployment directory.
"userConfigFilePath": "",
This is the path that was the source .cfg file used for deployment. It is not used anywhere at runtime.
"clusterConfigFilePath": "",
Config file's (.cfg file's) deployment directory path, i.e, the path to the configuration file that was uploaded in the deployment directory. The config file is optional.
"encryptFiles": true,
Turn it to true or false to set the encryption of the configuration (.cfg) file on or off.
"comment": "Modifying by reducing the body",
User comment (i.e., description) attached to a deployment.
"id": 0,
Deployment ID of the deployment in case of modification. Use zero for new deployments.
"name": "DeploymentTesting"
Name of the Deployment, this should be a unique name.
}
3.5.3. Post Deployment Modification
The ‘POST /api/Deployment’ API can also be used to modify an existing deployment. In this API’s Request Body, details of an existing deployment are required.
In this scenario, we want to update the name of the above-created DeploymentTesting. However, we do not have its details available.
So, to gather the details, we firstly use the ‘GET api/Deployments’ API to fetch the info of the existing deployment. Then, we copy the deployment Id, UpdateDtTm, and CreatedDtTm fields from the response.
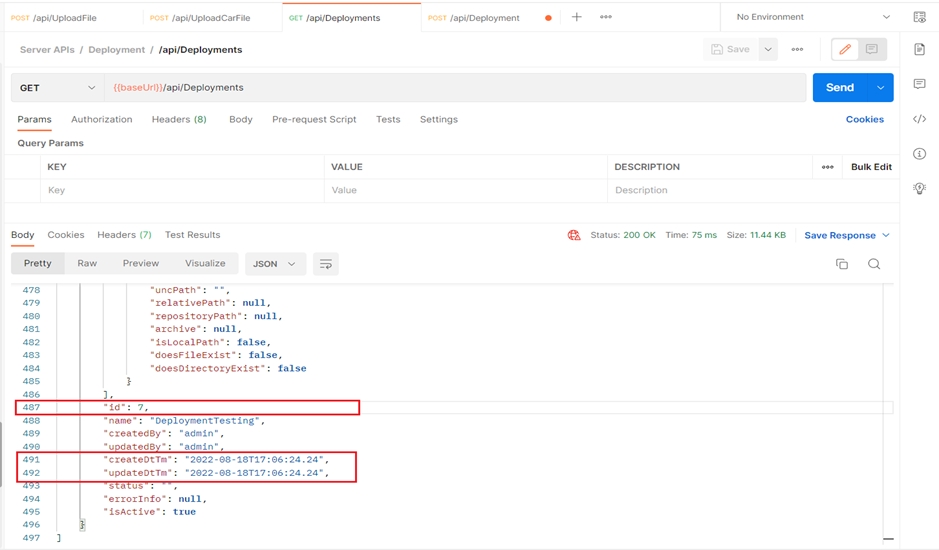
Now, in the POST Request’s Body, let’s change the deployment Name to DeploymentTesting_Modified and replace the values of Id, UpdateDtTm, and CreatedDtTm fields with the values copied from the GET response.
Let’s send the request.
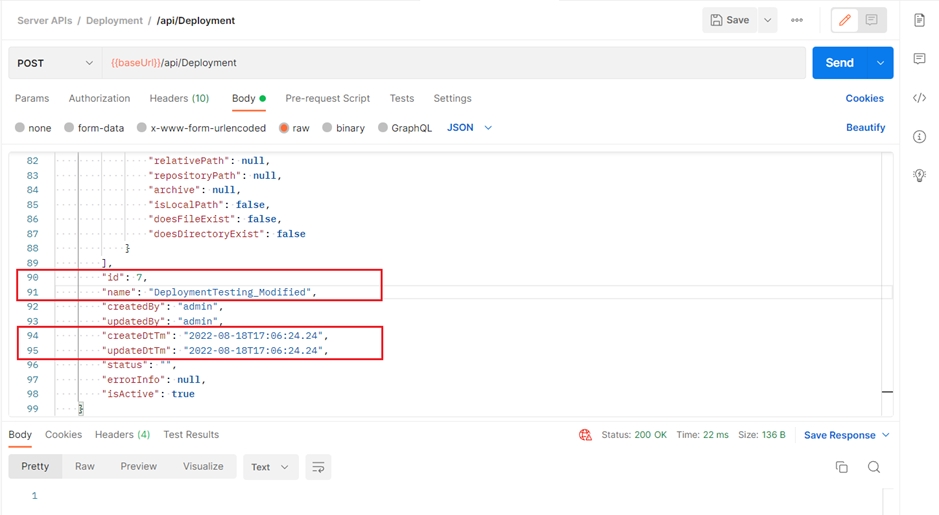
A 200 OK response is received. Now, go to Server > Deployment Settings > Deployment, in the deployment window, we can see the modified deployment name.
Let’s proceed to learn how we can schedule jobs on the server using APIs.
3.6. Scheduling Jobs
3.6.1. Scheduling Jobs using ‘POST api/Schedule’ API example
In this section, we are scheduling the previously created deployment using the ‘POST api/Schedule’ API.
This API’s Request Body requires the schedule configuration information, i.e., Schedule Name, Schedule Type, Frequency, Activate State, Server Info, etc.
A sample JSON is attached here for reference.
Let’s create the schedule called Schedule_Testing, which runs daily, with schedule type deployment, an active state as True, etc.
Sending the request shows a 200 OK status response.
If we go to Server > Job Schedules, in the scheduler window, we can see a schedule called Schedule_Testing with the following properties: Schedule Job Id is 4, with Schedule Type as Deployment, running at Frequency daily has been created.

Each time we update an existing schedule the UpdateDtTm field is modified as well. Therefore, we always have to send a GET api/Schedules or a GET /api/Schedule/:scheduleId request first to fetch the details and then use the received details as the body for the POST request to successfully modify a schedule.
3.6.2. Schedule job API Parameters description
{
"archiveStartItem": "C:\\DataflowSample.Df",
Initial artifact to run from the deployment. Omit if not using an archive.
"schedule": {
"dailyScheduleBase": {
"startTime": "2022-09-06T04:53:46.2573662-07:00",
Date and time when this scheduled job should first start. Since this is a daily schedule, this job will repeat everyday on the same time given here.
"typeName": "Astera.Core.DailyScheduleEveryDay"
Type of the schedule. i.e, daily, weekly, etc.
},
"typeName": "Astera.Core.DailySchedule"
Type of the schedule. i.e, daily, weekly, etc.
},
"traceLevel": "Job",
Set this parameter to 'Job' if you want to track it in job monitor, otherwise this job's progress will not be tracked.
"skipIfRunning": false,
Set this to true if you want to skip if the same schedule's last run is already queued or running.
"isActive": true,
Activates/deactivates the schedule.
"jobOptions": {
"usePushdownOptimization": false,
Set this to true if you want to run scheduled job in 'Pushdown mode'.
},
"filePathResolved": {
This section sets the file path of the archive or flow file.
"path": "C:\\SampleConfigFile\\test.car"
Path to the .car, .df or .wf file depending on 'isFile' parameter.
},
"deploymentId": 1,
Deployment ID in case using an archive deployment, i.e, 'isFile' is set to 'false'. This can be found under Server->Deployment.
"isFile": false,
Set this to True if pointing to a dataflow or workflow file directly, otherwise if using deployment set this to false.
"name": "test"
Name of the scheduled job.
}
A postman collection containing all the server APIs discussed in this article is attached here.
Was this helpful?