> For the complete documentation index, see [llms.txt](https://documentation.astera.com/llms.txt). Markdown versions of documentation pages are available by appending `.md` to page URLs; this page is available as [Markdown](https://documentation.astera.com/api-flow/api-publishing/manage/server-browser-functionalities-for-api-publishing.md).
# Server Browser Functionalities for API Publishing
The Server Browser in Astera can be used to see all the Deployments/APIs/API services that the user has deployed onto the Astera Server.
### API Deployment View
Once we have deployed our API flows, we can see the deployment in the Server Browser,
We can select a different view if we click on the *Select Deployment View - Filter* option (the filter icon on the left) in the Server Browser toolbar.
Let's select *API Deployments* from the drop-down menu.
This will open a new view for the user. Here, you can directly see the deployments that have been made by the user(s). If we expand a deployment, we can see all the available endpoints under it.
When we deploy the API flow, a description is automatically added, for each endpoint/API flow. This is with respect to the action performed by the API flow.
{% hint style="info" %}
**Note:** We can see two entries for each endpoint because each endpoint can be processed Synchronously and Asynchronously.
{% endhint %}
Synchronously processed endpoints can be seen with the HTTP method on its own and Asynchronously processed endpoints can be seen with the HTTP method encircled with blue curves.
### Active Endpoint View
We can see a consolidated view containing only the active endpoints from each deployment using the following option.
This will show the user a different view,
We can see the endpoints in a tree-like or hierarchical structure. Each endpoint is characterized based on its resource.
Upon hovering over each endpoint, their *Request URL* can be seen,
### Context Options
#### Deployment Context Options
If we move back to the API Deployment View, we can see some options in the context menu of each of the deployments.
*View Deployment:* Selecting this option will let the user view the deployment in the deployment manager.
Next, there are a few options present under *Swagger Options,*
*View Swagger UI -* Lets the user view the endpoint within a Swagger UI, in Astera Data Stack.
*Export as OpenAPI file:* Selecting this option will allow the user to generate an Open API specification JSON file which we can export/save to the desired location, be it local or on a network.
{% hint style="info" %}
**Note:** This file can be used to import the API collection to any third-party tool i.e., Postman, Insomnia, etc., for consumption.
{% endhint %}
*Copy Swagger URL:* This option lets the user copy the Swagger URL for the deployment. We can use this URL to generate the swagger definition file for the API collection.
*Delete Deployment:* Selecting this option will remove the selected deployment from the Server Browser.
*Generate Testflow for All Endpoints -* This option generates test flows for all endpoints present in the deployment.
#### Endpoint Context Options
Each deployment can either have a single endpoint or multiple ones. Similar to deployment, a context menu is available for each endpoint as well.
*Copy URL to Clipboard:* This option allows the user to copy the endpoint’s request URL to the clipboard.
*Show Runtime Trace:* Selecting this option will show the runtime trace for that endpoint.
*Deactivate:* Selecting this option will deactivate a particular endpoint.
{% hint style="info" %}
**Note:** Select the *Activate* option to re-activate the service.
{% endhint %}
*Do Not Require Authentication:* Selecting this option will disable the authentication required by this endpoint. To enable the authentication, open the context menu again and select the *Authentication Required* option.
*Generate Test Flow -* Select this option to generate a test flow for the selected endpoint.
### Security
In terms of security, Astera gives the user the ability to define roles and provide resources to each role.
The security view in the Server Browser can be selected from the Server Browser drop-down menu,
This will open a new view,
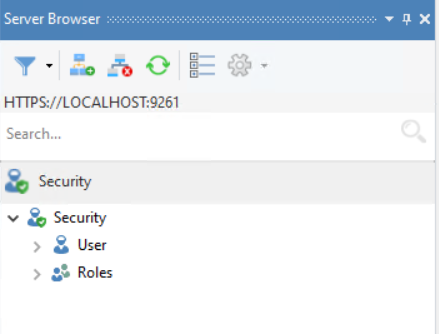
Expanding the *User* and *Roles* nodes shows us the Astera client’s users and the available roles respectively.
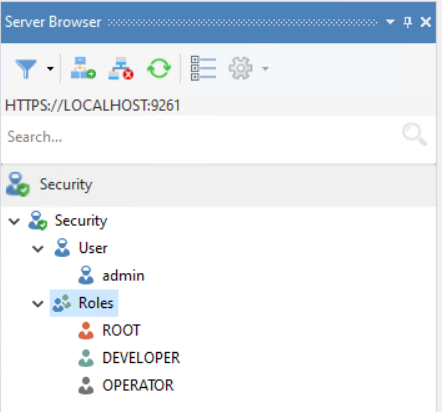
Resources of each role can be allocated by right-clicking on the role and selecting *Edit Role Resources* from the context menu.
{% hint style="info" %}
**Note:**
* New users can be added by right-clicking on the *User* option and selecting *Register User* from the context menu.
* New roles can be added by right-clicking on the *Roles* option and selecting *Add New Role* from the context menu.
{% endhint %}
Here, the resources available below are,
* *URL*
* *Cmd*
* *REST – Publishing and Publishing Async*
{% hint style="info" %}
**Note:** A user needs to have the resources enabled for the deployed API to avail the API services. Otherwise, they might never be able to use the deployed APIs.
{% endhint %}
{% hint style="info" %}
**Note:** Users will only be able to access the resources that have been allocated to their role.
{% endhint %}
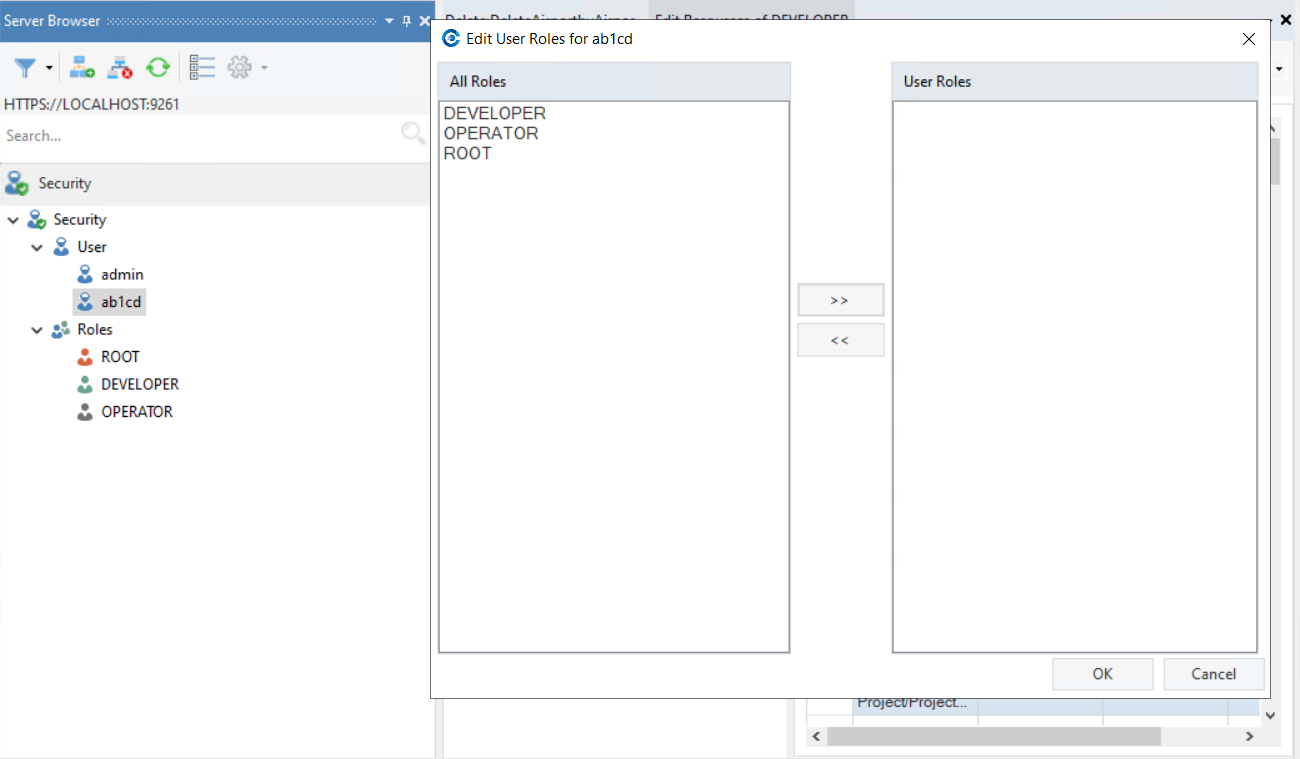
To assign a role to a user, right-click on the user and select *Edit User Roles* from the context menu.
{% hint style="info" %}
**Note:** Selecting the specific role and then clicking the right-facing arrow will assign the role to the user. Clicking the left-facing arrow after checking a role will remove the role from the user.
{% endhint %}
### Resource Catalog View
We can also view the details of our Resource Catalog in the Server Browser. Simply hover over the *Resource Catalog View* option from the drop-down menu.
Here, you will be able to see the following options,
*View by Artifact Type -* Gives the user a catalog view based on artifacts.
View by Namespace - Gives the user a catalog view based on namespace.
### Additional Server Browser Options
Apart from the deployment view options, these are the following options also present on the main menu bar of the Server Browser.
*Add Deployment:* Adds a new deployment
*Remove All Deployments:* Removes all deployments present on the Server Browser
*Expand All:* Expands each of the nodes of all the deployments.
*Search Bar:* Here, you can write a name to search for any specific deployment or an endpoint.
This concludes the Server Browser functionalities for API Publishing in Astera.
---
# Agent Instructions
This documentation is published with GitBook. GitBook is the documentation platform designed so that both humans and AI agents can read, navigate, and reason over technical content effectively. Learn more at gitbook.com.
## Querying This Documentation
If you need additional information that is not directly available in this page, you can query the documentation dynamically by asking a question.
Perform an HTTP GET request on the current page URL with the `ask` query parameter, and the optional `goal` query parameter:
```
GET https://documentation.astera.com/api-flow/api-publishing/manage/server-browser-functionalities-for-api-publishing.md?ask=&goal=
```
`ask` is the immediate question: it should be specific, self-contained, and written in natural language.
`goal` is optional and describes the broader end goal you are ultimately trying to accomplish on behalf of the user. GitBook uses it to tailor the answer towards what is most useful for that goal.
The response will contain a direct answer to the question and relevant excerpts and sources from the documentation.
Use this mechanism when the answer is not explicitly present in the current page, you need clarification or additional context, or you want to retrieve related documentation sections.