Build Dimensional Model
The Build Dimensional Model feature provides an easier and quicker way to build a dimensional model by selecting and configuring fact and dimension entities.
Through this option, the process of designing a dimensional model architecture is significantly automated, streamlining the overall development experience. The feature intelligently handles various aspects of the model creation such as configuring fact and dimension entities, establishing relationships between them, automatically identifying primary and foreign keys, assigning surrogate keys and row identifiers, and more. By eliminating the need for manual intervention, this option significantly reduces the time and effort required for dimensional modelling.
Let’s see how we can build a dimensional model using the Build Dimensional Model feature of Astera Data Warehouse Builder.
Building a Dimensional Model
To build a dimensional model, first create a new data warehousing project or open an existing data warehousing project, and Reverse Engineer a database.
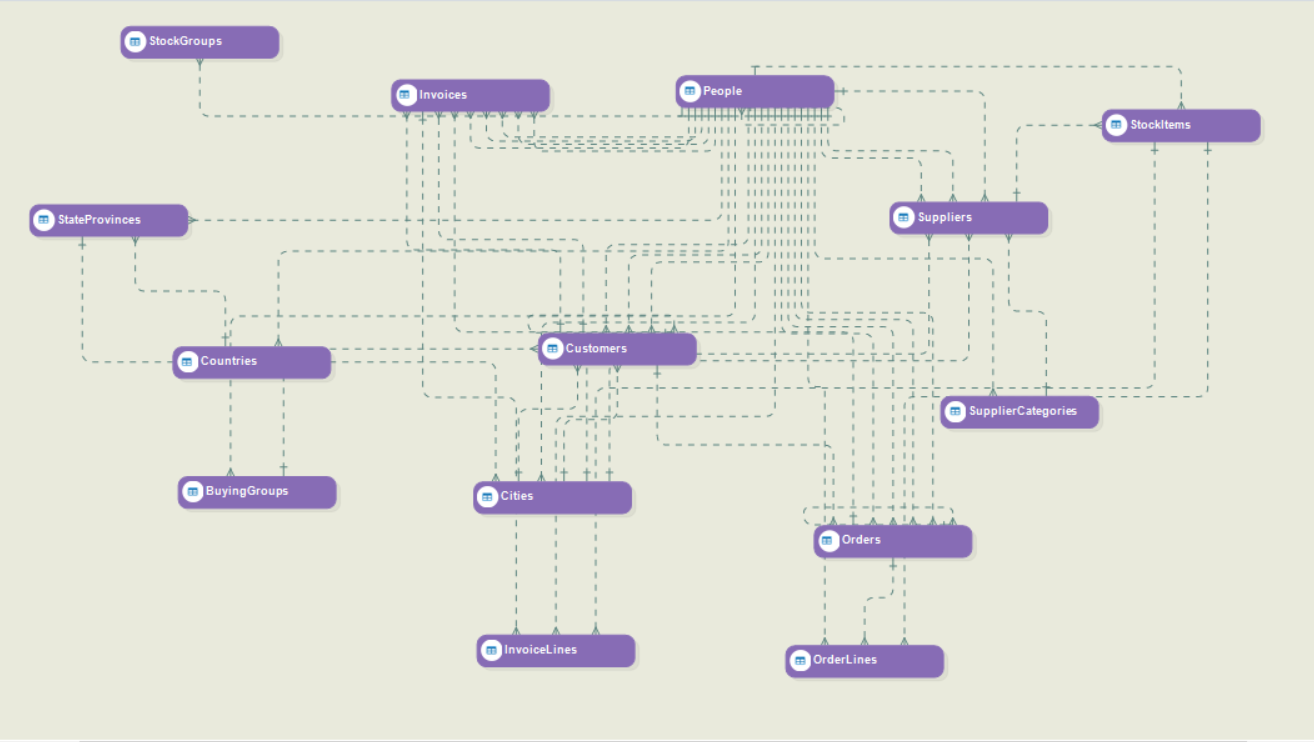
Let’s consider the following source model, using which we need to derive a star schema architecture.

Using the Build Dimensional Model option, you can automate the creation of the star schema from the source model instead of manually configuring the fact and dimension entities and other aspects of the dimensional model.
Go to Main Menu > Data Model and select the Build Dimensional Model option.
The Build Dimensional Model window will open.
Under the Select Fact(s) and Dimension(s) section, select the entities you want to include in your dimensional model. When an entity is selected, it is marked as a Dimension by default. If the entity that you have selected is a Fact entity, check the Fact checkbox next to the entity name.
The Auto Detect option automatically sets an entity as a fact, dimension or a general entity based on its relationships with other entities. The entity with foreign keys referring to other entities is chosen as the fact entity.
You can configure facts and dimensions using the options provided under the Facts/Dimensions Configuration section.
Add Row Identifier: A row identifier helps identifying the current and previous records while dealing with SCD2 or SCD6 elements. You can choose one of the following row identifiers from the Add Row Identifier dropdown.
Current Record Designator: stores the Active Value for the current record, and the Inactive Value for the previous records.
Current Record Designator: stores the Active Value for the current record, and the Inactive Value for the previous records.
Version Number: stores the version number of the records.
Effective Date: stores the effective date of the records.
Expiry Date: stores the expiration date of the records.
Effective Expiration Date: stores the effective and expiration date of the records.
None: Choose this option if you do not want to add a row identifier. However, a row identifier is needed for SCD2 and SCD6 elements.
Child Fact Entity Options: If you have more than one entity selected as a fact entity, you can choose from one of the following options for the child fact entity.
Merge into Parent Fact: merges the child fact entity with the parent fact entity.
Treat as Separate Fact: treats the child fact entity as a separate entity, without merging it with the parent fact entity. The dimensions are shared by all facts.
None: does not treat the child fact entity as a separate fact. The dimensions are not shared by the child fact.
Add Date/ Time Relationships: If you want to add a date or time dimension to your dimensional model, you can choose one of the following options.
Date Relationships: adds a Date Dimension and its relationships with the fact entities.
Time Relationships: adds a Time Dimension and its relationships with the fact entities.
Both Date & Time Dimensions: adds both Date and Time Dimensions and their relationships with the fact entities.
None: does not add a Date or Time dimension.
Add Surrogate Key in Fact Entities: This option adds a surrogate key for all fact entities, if checked.
Add Surrogate Key in Dimension Entities: This option adds a surrogate key for all dimension entities, if checked.
Extract only Numeric Fields for Fact Entities: This option drops all the non-numeric attributes of the fact entities ,if checked.
After you have made your selections, click OK. A dimensional model, based on your selections and configuration, will be built.
USE CASE:
Let’s build a dimensional model with the following selections.
Mark the Cities, Suppliers, Customers and StockItems entities as Dimensions.
Mark the Invoice and InvoiceLines entities as Facts.
Select Effective Expiration Range as the row identifier.
Select Merge into Parent Fact under the Child Fact Entity Options. The child fact entity (InvoiceLines) will be merged into the parent fact entity (Invoice).
Select Both Date and Time Dimensions under the Add Date/Time Relationships option.
Check the checkboxes for adding surrogate keys to Fact and Dimension entities.
Uncheck the Extract only Numeric Fields for Fact Entities checkbox to include all numeric and non-numeric attributes of the fact entity.
Click OK. The following Dimensional Model will be built with all the configurations selected above.
This provides a starting point for the dimensional model. You can make any desired changes to the dimensional model, for example, adding SCD type definitions, prior to forward engineering it.
This concludes our discussion on how to build a dimensional model using the Build Dimensional Model option.
Was this helpful?